
Introduction
A document is simply a file that can be related to a record in itris - think of it as connecting all your important paperwork directly to the relevant people, companies and jobs.
Storing documents within itris rather than scattered across your computer’s file system brings some serious benefits. First off, you can share them easily with colleagues without the usual “can you send me that CV again?” back-and-forth. Everything’s accessible quickly from the related record, so when you’re looking at a candidate, their CV is right there - no hunting through folders or trying to remember where you saved it. Plus, they’re secure within the system, which means you don’t have to worry about sensitive documents sitting unprotected on someone’s desktop or getting lost when people leave the company. It’s basically like having a super-organized filing cabinet that everyone can access instantly, but with proper security controls in place.
Adding Documents
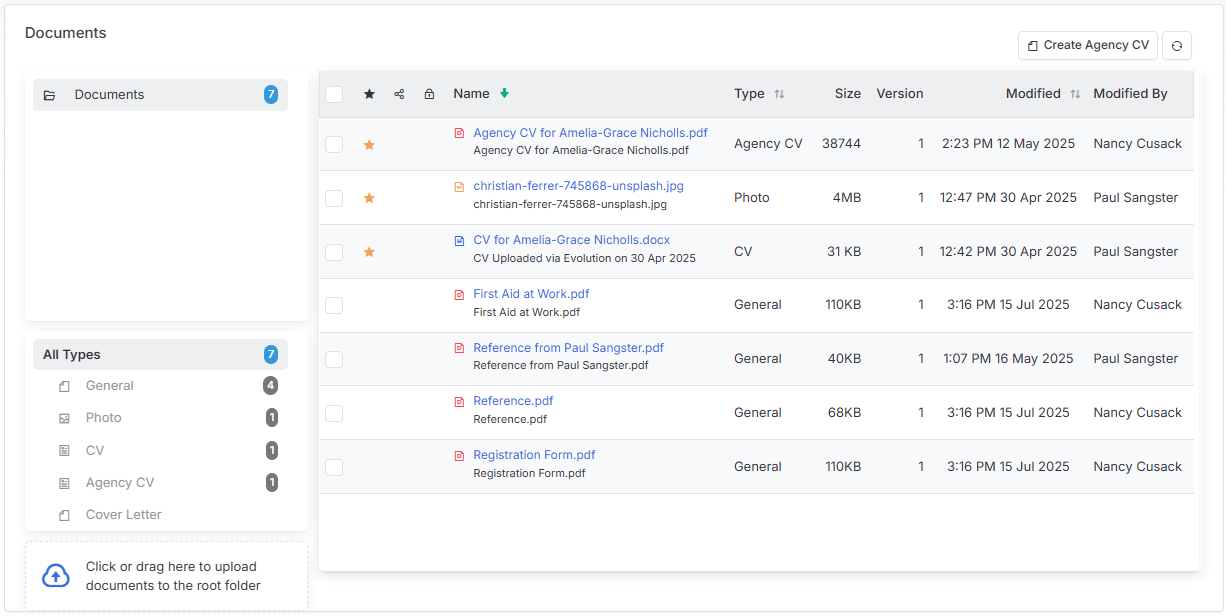
Getting documents into itris is simple - you can either drag and drop files straight into the designated area, or click to navigate to your folder and select what you need. No complicated upload processes or multiple steps to remember.
Organising Documents
Document Types
The system keeps everything tidy by organizing documents into logical Types that make sense for recruitment work. Types will differ by record type so that appropriate types are shown. You can add your own Types via Tools & Setting | Document Settings.
System Types include:
- Photos/logos - For company branding and candidate photos
- CVs - All your candidate resumes in one place
- General - Everything else that doesn’t fit the other categories
You can easily filter what you’re looking at by clicking on any document type in the left panel - it’s like having instant sorting without any of the manual work.
Creating and Using Folders
Folders are your friend when you want to get really organized. You can create them on the fly, or set up global folders through Tools & Setting | Document Settings if you want consistency across your whole team.
When you select a folder, it acts like a filter for the document Types section below it - so you’re only seeing what’s relevant to that particular folder.
Document Options and Actions
Right-clicking on any document gives you a dropdown menu packed with useful options.
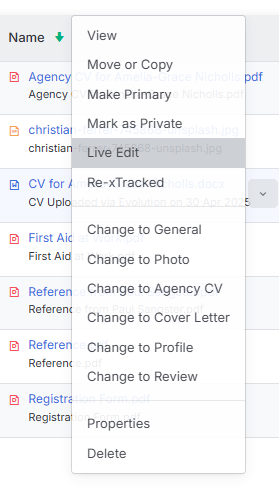
- Change to - Switch document types, for example when you realise that it should actually be filed under a different category
- Properties - Rename documents to something more meaningful
- Move/copy - Relocate documents between folders
- Live edit - Edit documents without downloading them first. Once you open it for editing, you might need to enable editing, make your changes, save, and close
- View - Preview documents without downloading them to your computer
Image Editing Features
For image files, you’ve got some handy editing tools built right in. The crop function is particularly useful - perfect for tidying up candidate photos or company logos without needing separate software.
Multi-Select
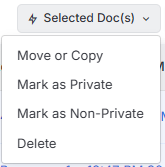
When you need to work with multiple documents at once, just select them all and you can move or delete them in one go. No need to handle each file individually.
Agency CVs
You can also create Agency CVs directly from the documents area, see the article Agency CVs for more details.
Version Control
Documents can now be version controlled allowing for multiple versions of a single document to be managed from one version to another.
Document History needs to be switched on within Document Settings in order to be activated and provides the following features:
- Documents edited automatically create a new version, storing all existing versions
- Only the latest version is displayed in the Documents List for ease of reference
- The new Version column allows you to view how many versions exist for that document
- Existing versions can be viewed easily to assess changes made or pervious content
- You can opt to Rollback to a previous version should you wish to discard changes
Creating a new Version
To create a new version of a document, simply use the Documents Menu and click the Live Edit function.
This will store a version of the current document and open the new version for editing and can be done as many times as required, with the last version of the document being automatically stored in the version history.
Viewing Previous Versions
To see how many versions exist for a document and view them, use the new Version column withing the Documents list:
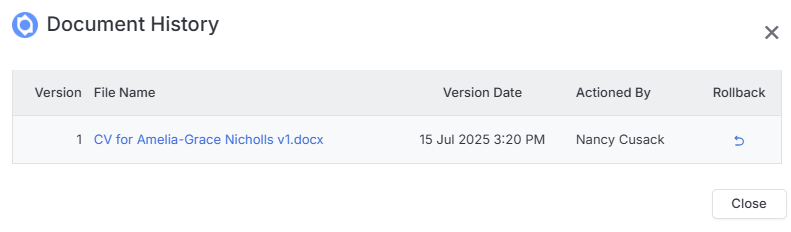
This will popup a window showing you the previous versions, the dates and times they where controlled and by which user.
Clicking on the File Name of these documents will open the document viewer allowing you to see the content of each version.
Rolling Back to a Previous Version
To roll back to a previous version of a document, click the Version number to display the previous versions available and view each if required to confirm the version to keep.
Then click the Rollback icon and confirm the roll back action. This will remove all version down to the version to keep and replace the main document in the list with the selected version.