
Introduction
In the competitive recruitment landscape, waiting for job orders to come in isn’t enough to build a thriving agency. When done strategically, speculative CV submissions don’t just fill immediate needs—they educate clients about market talent, showcase your understanding of their business, and keep your agency top-of-mind for future opportunities.
Due to itris being highly customisable, the order and name of the tabs, and the placement of the record blocks may differ to those shown in this article.
Prospects Block & Cards
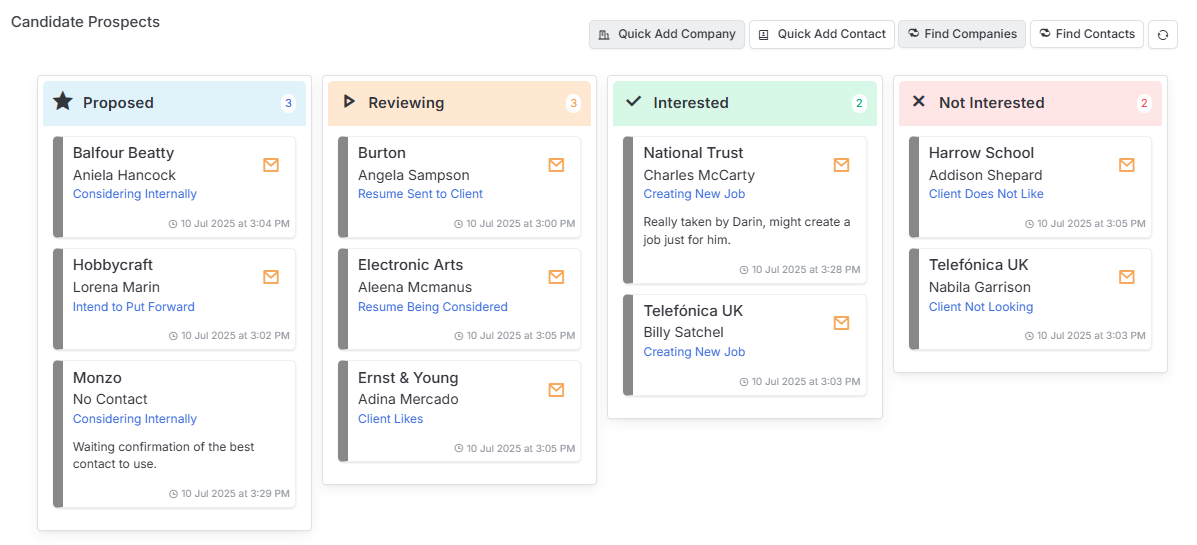
The Prospecting block provides a centralized view of all your speculative CV activities, though its location varies depending on the record type you’re viewing.
For Candidate and Contact records, you may find the Prospecting block under the Marketing tab, while Company records may display it under the Other tab. This strategic placement ensures the prospecting information is contextually relevant to the record you’re working with.
The columns within the block show the State of each Prospect activity, with total at top and the individual cards show:
- Relevant names - e.g. company, contact, candidate (depending which record type viewing from).
- The prospect status, e.g. Considering, put forward etc.
- The Date of the latest activity on the card.
- Notes added.
- Where a contact is linked an icon to send an email.
Prospecting Starting Points
The system offers multiple starting points for creating prospects, each designed to support different workflow approaches and strategic objectives. Understanding when to use each method will help you maximize the effectiveness of your prospecting efforts.
From Candidate Records
Find Company / Find Contact (Skills-Based Matching)
The intelligent matching Find Company and Find Contact button feature helps identify the most relevant prospects:
- Skills Matching: Automatically matches skills on the candidate record with skills profiles on company and contact records
- Prerequisites: Requires populated skills profiles (quick skills) on both candidate and company/contact records
- Selection Process: Shows matching results allowing you to choose which companies/contacts to add to the Proposed area
- Limitations: Only considers skills matching, other possible relevant parameters like location or company/contact type or status are not considered.
Quick Add Company/Contact
For more flexible prospect creation use the Quick Add buttons:
- Unrestricted Selection: Choose any company or contact record to link with the candidate
- No Matching Required: Doesn’t rely on skills profiles or other automated matching
- Manual Control: Gives you complete discretion over prospect selection
From Company Records
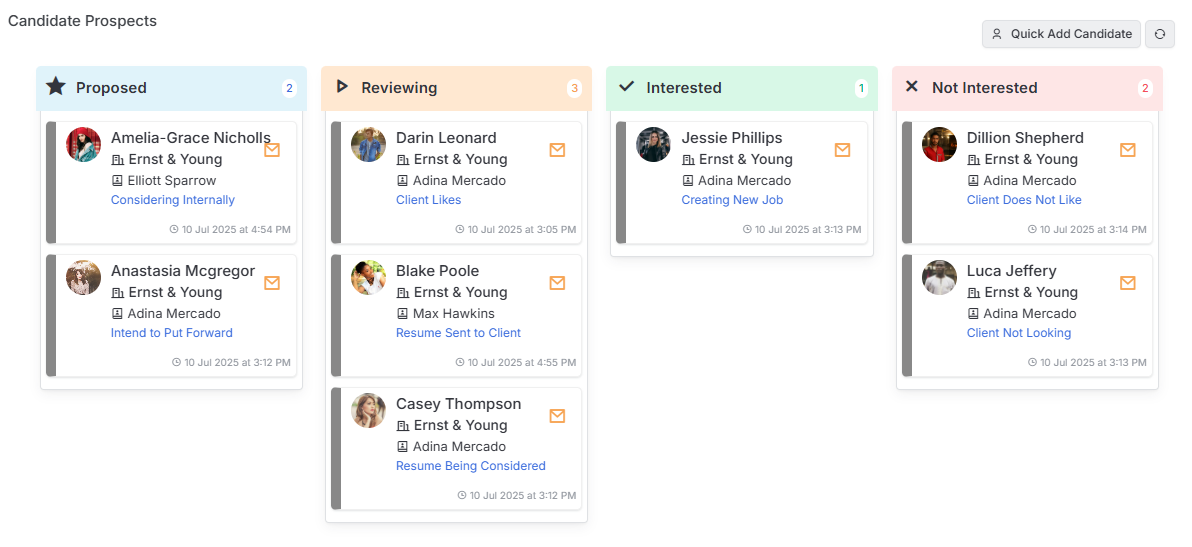
This area will show prospects for all contacts at the Company.
Quick Add Candidate
- Reverse Workflow: Start from the company and add relevant candidates
- Flexibility: Choose any candidate to prospect to the company
- Strategic Approach: Useful when you know a company’s needs but want to select specific candidates
From Contact Records
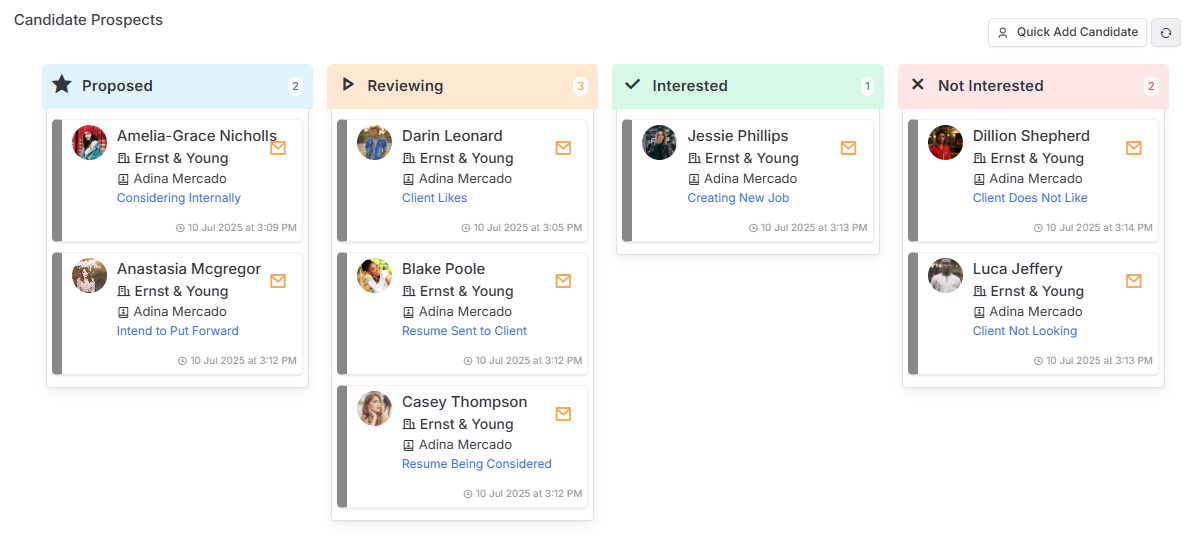
Quick Add Candidate
- Personal Connection: Leverage existing contact relationships
- Targeted Approach: Select candidates specifically for individual contacts
- Relationship Building: Strengthen personal connections through relevant candidate sharing
Using Views for Advanced Prospecting
Company & Contact Record Views provide the most sophisticated prospecting capabilities by allowing you to combine multiple criteria beyond simple skills matching. This approach enables you to create highly targeted prospect lists based on complex business logic and strategic considerations.
Advanced Filtering Options
Go beyond basic skills matching by filtering on more parameters, including but not limited to:
- Location: Target geographically relevant prospects
- Marketing Preferences: Ensure contacts have opted into marketing communications
- Company/Contact Status & Type: Focus on active, relevant prospects
- Custom Fields: Use company-specific criteria
- Last Contacted: Avoid over-contacting or re-engage dormant relationships
Bulk Prospect Creation
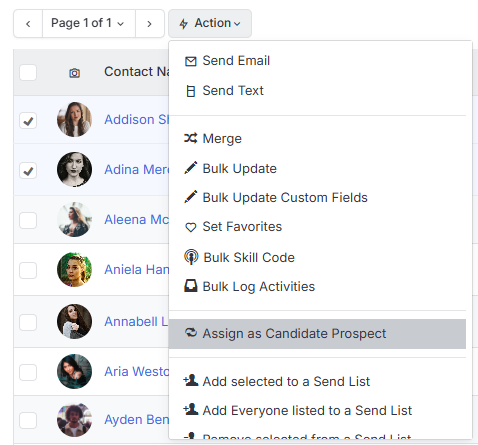
Once you’ve refined your view to display your target audience, you can create multiple prospects simultaneously using the bulk action functionality.
Use tick boxes to select one or more relevant contacts or companies, then click the action button and select “Assign as Candidate Prospect”.
Managing Your Prospecting Workflow
When you create a new prospect through any of the methods described above, it automatically appears as a card in the “Proposed” column. This represents the initial stage where you’ve identified a potential match but haven’t yet taken action.
Progressing prospects through the workflow can be accomplished through simple drag-and-drop functionality.
However, clicking on a prospect card’s status opens detailed management options.
Here you can add contact information if it wasn’t included during the initial prospect creation, ensuring all prospects have the necessary details for progression. The notes functionality allows you to record important details about prospect interactions, client feedback, or strategic considerations for future reference.
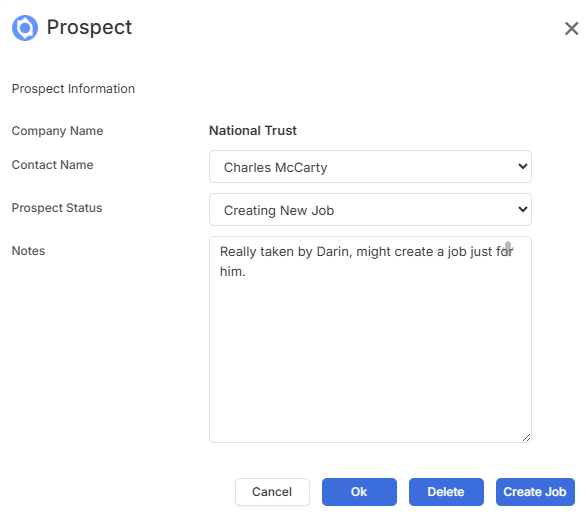
The Prospect statuses and the columns they relate to can be managed in the Candidate Settings area of Tools & Settings.
Emailing Prospect CVs
When a contact is linked to a prospect, clicking the email icon on the prospect card opens the email form with the candidates CV attached.
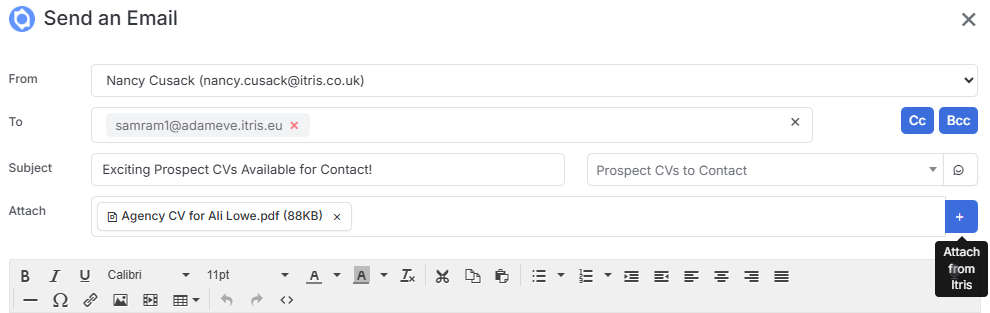
With emailing prospect CV’s to contacts, templates are particularly valuable for maintaining consistency in messaging and ensuring all necessary information is included. However, emails can be free typed too.
Before sending the email you may wish to set a reminder to follow up on this.

Once a prospect CV has been emailed to a contact, this is considered a Speculative CV submission.
Creating a Job from a Prospect
Most importantly, you can create job opportunities directly from the prospect card, seamlessly transitioning from speculative activity to active recruitment. This is done via editing the Prospect card and clicking Create Job.

When you create a job from a prospect, itris automatically progresses the prospect card to “Interested” status, indicating that the speculative activity has generated client interest.
The candidate associated with the prospect is automatically added to the shortlist on the newly created job, ensuring continuity between the prospecting and recruitment processes.
Sending Multiple Candidates
The benefit of using the Prospecting area of records is the ability to make notes on each prospect and move them through the workflow register if the contact was interested or not. However, with the Prospect workflow only one CV is sent at a time.
In scenarios where you wish to submit multiple prospect CVs to a contact, this can be achieved by opening an email to that contact, and via the attachments area adding one or more candidate CVs.
Don’t forget, before sending the email you may wish to set a reminder at the foot of the email to follow up on this.
As with above, once the email is sent this is considered a Speculative CV submission.
Sending to Multiple Contacts
When your workflow calls for sending a candidate(s) to a large number of contacts this can be achieved from a Contact View. The steps described below will create a Campaign email to your contacts, within which is a link to view the Candidate CV(s).
This workflow requires some one time set up:
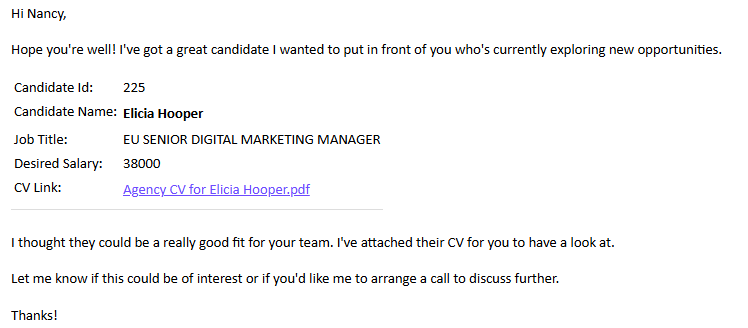
Create Market Resource Summary- this will be used in the Market Candidates email template (see below) and consists of various fields from the candidate record including, but not limited to, name, desired salary, location and more as selected by you. Additionally there is a required field for the link to view the candidates CV. For more details see the Tools & Settings | Candidate Settings article.
Create Market Candidates email template - this will contain the Market Resource Summary along with other relevant tags such as Contact Name and the rest of the body of the email that will be sent to the Contacts. This email will need to be saved under the System Type “Market Candidates”. For more details see the Tools & Settings | Standard Templates article.
On the Contact View, via the Action menu, you can choose to Market Candidates to the Contacts selected (ticked) on the results page you are viewing, or to Everyone in the contact view.
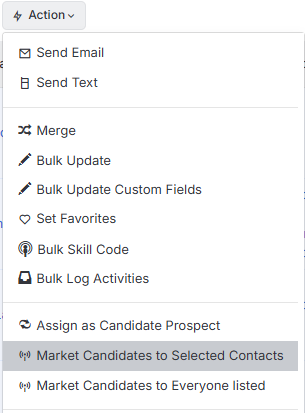
You will then have the opportunity to select one or more candidate to include, only Candidates with CVs (agency or original) will be eligible for selection. See the Agency CVs article for more details.
When choosing the Email Template, ensure you select a relevant template (e.g. one set up with the Market Resource Summary and under the System Type “Marketed Candidates”).
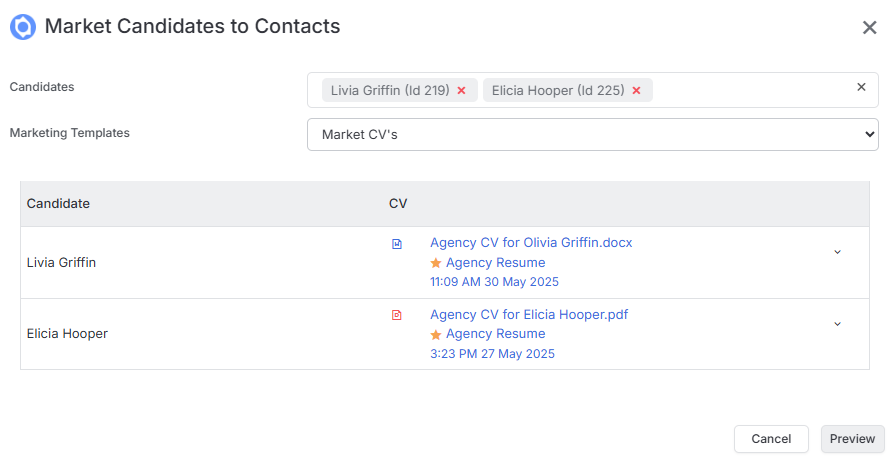
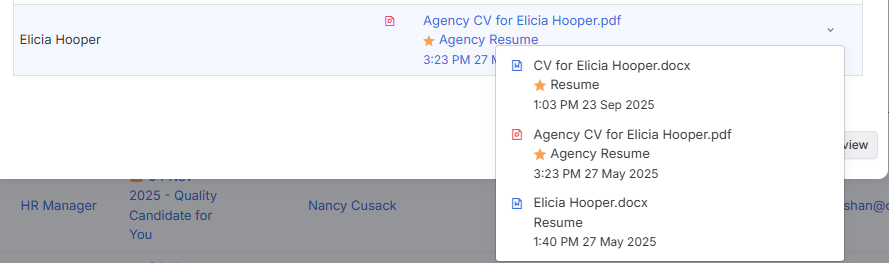
At this stage, if the candidate has multiple CVs you can select from the down arrow at the end of their row.
Next you can Preview and Send the email, which when received will contain a link to view the Candidate CV.
Once this email had been sent, these are considered a Speculative CV(s) submissions, an activity will have been created against the Candidate, Company & Contact, and will be logged in the Campaigns area.
Reporting
Dashboards
Within the Dashboard the Speculative CV and CV Sent widgets will include the Speculative CVs sent via email as described in the workflow above, the later of these widgets will also include CVs sent to jobs.
Additionally, if you have KPI Targets set for Speculative CVs and CV Sends these can be viewed via the Dashboard too.
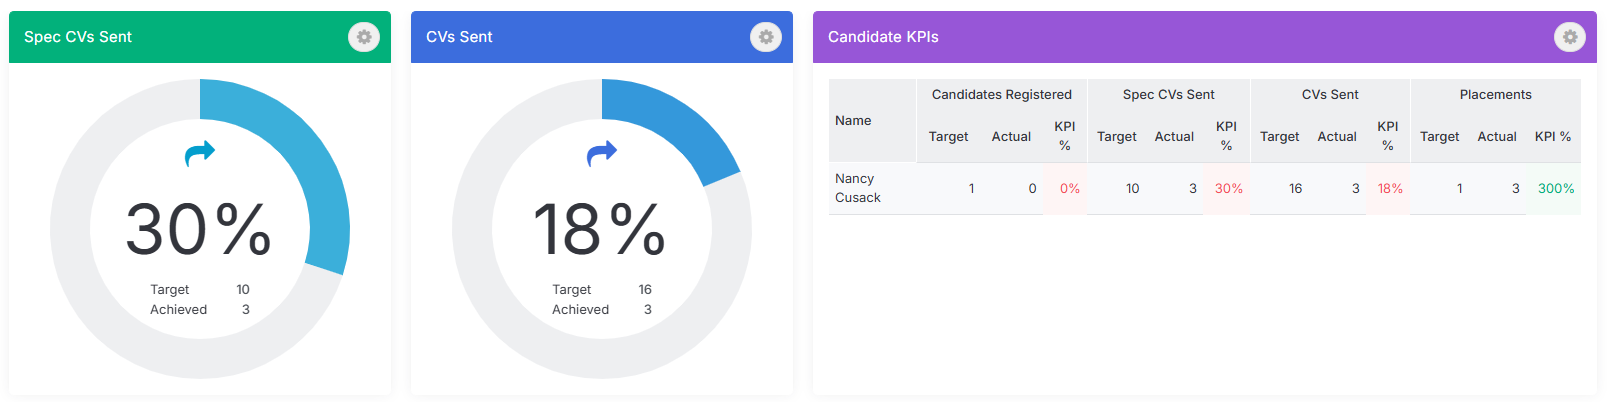
See the Dashboards and User Targets articles for more information.
Reports
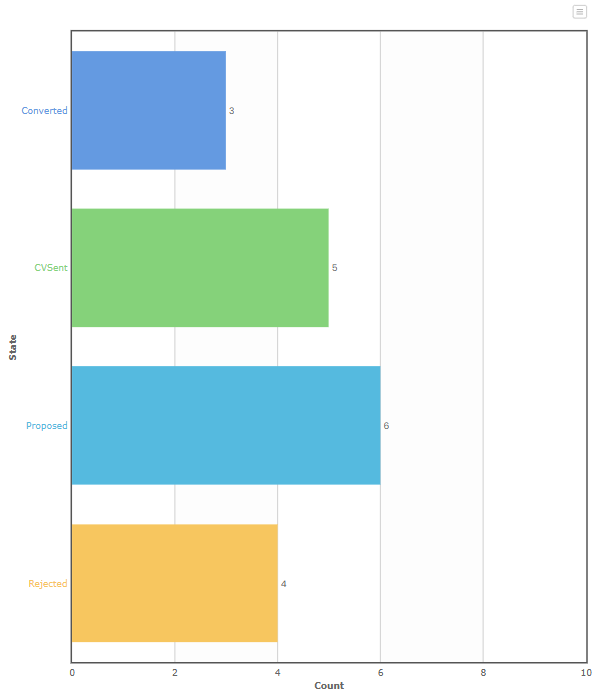
Both Speculative CVs and the various stages of Prospecting can be reported on in the reports area. These reports can also be added to your Dashboards too.
When creating or working with these reports, remember that a Speculative CV is one that has been emailed to the contact and therefore can be reported on in Speculative CV Reports, this report can also be filtered by the Assigned user.
The Prospecting reports can show all stages/statuses of Prospecting, not just those physically sent to the contact.
See the Reporting article for more information.